E-Mail Send Azure Functions & Logic Apps
This post is about the question of how you best send e-mails in workflow processes like Logic App or Azure Function.
In many areas, Logic Apps are used for further processing and sending e-mails. These Logic App connectors get data that needs to be sent or processed via Azure Function or Storage Account Triggers.

In most cases, the connector “Send an email from a shared mailbox (V2)” is then used in Logic App and logged in with the user credentials. Some of the connectors are not exactly optimal because user accounts are actually avoided within the entire automation and managed identities or service principals are used as an alternative.
This means that I no longer have to worry about connectors and users, but can concentrate fully on my automation. Furthermore, there are a few benefits in that I am much more flexible in my deployment and can implement more complex requirements.
Anyone who has ever had to do with filtering lists and sorting in Logic App and then sending them by email will enjoy using Azure Function instead of Logic App. However, we also have some limitations. It is not low-code, so you need to be familiar with functions and code creation and also the limitations of functions (runtime max time, input, output, module import, etc.).
| Service | pro | con |
|---|---|---|
| Azure Function | - Flexible and code-based extendable - More scalable and usually more cost-effective | - Code based (no low code) - a deeper understanding of function and coding |
| Logic App | - Low-Code - Very easy to create, using ready-to-use connectors - Mostly simple troubleshooting | - depending on connectors (HTTP with restrictions) - Specific use cases and formatting are sometimes difficult to implement |
Here is what sending an e-mail looks like in the Azure Function PowerShell.
First of all, we needed the corresponding modules within the function. That means we customize the requirements.psd1 and expand the required modules.
@{

    # For latest supported version, go to 'https://www.powershellgallery.com/packages/Az'. Uncomment the next line and replace the MAJOR_VERSION, e.g., 'Az' = '5.*'

    # 'Az' = 'MAJOR_VERSION.*'
    'PSReadLine' = '2.3.4'

    'Microsoft.Graph.Authentication' = 'X.X.X'
}
We needed the 'Microsoft.Graph.Authentication' module for authentication. It is a good idea to set a version directly and update it at regular intervals, as it has happened several times that the latest versions do not work correctly.
In the next step, we add the login part to the function. Since we want to develop and test functions locally using Function Core Tools, the first part is the use of a service principal and when the Azure function is deployed, it automatically uses the managed identity.
# Input bindings are passed in via param block.

param($Timer)

# Get the current universal time in the default string format
$currentUTCtime = (Get-Date).ToUniversalTime()

if ($env:FUNCTIONS_CORETOOLS_ENVIRONMENT ) {
    Write-host "Using AppRegistration"
    $clientSecret = ConvertTo-SecureString -String $env:SECRET -AsPlainText -Force
    $credential = New-Object -TypeName System.Management.Automation.PSCredential -ArgumentList $env:APPID, $clientSecret

    Connect-MgGraph -TenantId $env:TENANT -ClientSecretCredential $credential -NoWelcome

}

else {

    Write-host "Using Managed Identity"
    Connect-MgGraph -Identity -NoWelcome

}
Write-Host "Authorized"
Therefore, before we can test this, it is important to activate the corresponding function (Managed Identity) and authorize the Graph API (Mail.Send - Application permission) and restrict it to the mailbox that is being used via policy.
When that's done, we can start with the actual use case and integrate sending an email into our function. That means that in the first step, we define an email payload object that contains all the information such as content, recipient, sender, etc.
#Construct the payload for sendMail

$sendMailPayload = @{

    message = @{

        subject = "SUBJECT INFORMATION - USE CASE MAIL"

        body = @{

            contentType = "HTML"

            content     = $bodyContent

        }

        from = @{

            emailAddress = @{

                address = $MailSender

            }

        }

        toRecipients = @(

            @{

                emailAddress = @{

                    address = $MailRecipient

                }

            }

        )

    }

    saveToSentItems = $true

} | ConvertTo-Json -Depth 10
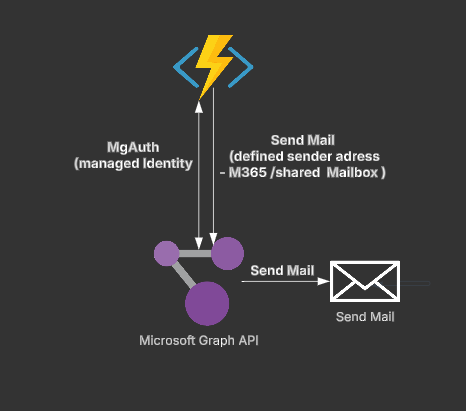
In the next step, we just define the Graph POST command and pass our payload. Now, if the correct authorization is provided, the managed identity or local service principal will be sent an e-mail via Graph using the application permission, so a user is no longer required.
#Send the email using Microsoft Graph

Invoke-MgGraphRequest -Uri "https://graph.microsoft.com/v1.0/users/$MailSender/sendMail" -Method POST -Body $sendMailPayload
Invoke-MgGraphRequest and Next.Link directly via the API. This is because, based on experience, changes are often made to modules and then MgUser or others may no longer return the expected output, so this is usually more long-term and has fewer restrictions.Default Language Office 365 Tenant
A frequent question regarding Office 365/Azure tenants is, which default language is used for the individual services and where it can be changed. In general, every user can set his own language in the user settings (MyAccount - Settings - Language and Time zone), but there are also services where the default language cannot be changed afterwards.
Enable Wake-on-LAN (WOL) with PowerShell
With every recent Windows 10 update, and they happen a lot, Windows unfortunately also resets the power settings of the network adapters. Since I like to start both my PC and notebook from a remote location or from within the same network, I wrote a little PowerShell function to enable Wake-on-LAN (WoL) again.