Send Email Notification with Power Automate based on SharePoint List Multi-Select Person Field
Many automations with Power Automate are based on SharePoint lists. Some of them are used to collect, analyze data and send notifications. This is where most of the requests come to send notifications by mail to specific users. This brings us directly to the topic of sending messages via Outlook Connector based on a person (with multiselect) field within the SharePoint list.

If we simply set a mail to the people, person (multi-select) field via Power Automate Flow, unfortunately this does not work, because the Outlook Connector does not support it, and only expects email addresses with semicolon separated notation.
To realize this, some intermediate steps are necessary by selecting the email addresses from the Person (multiselect) Field and formatting them for sending mail notifications.
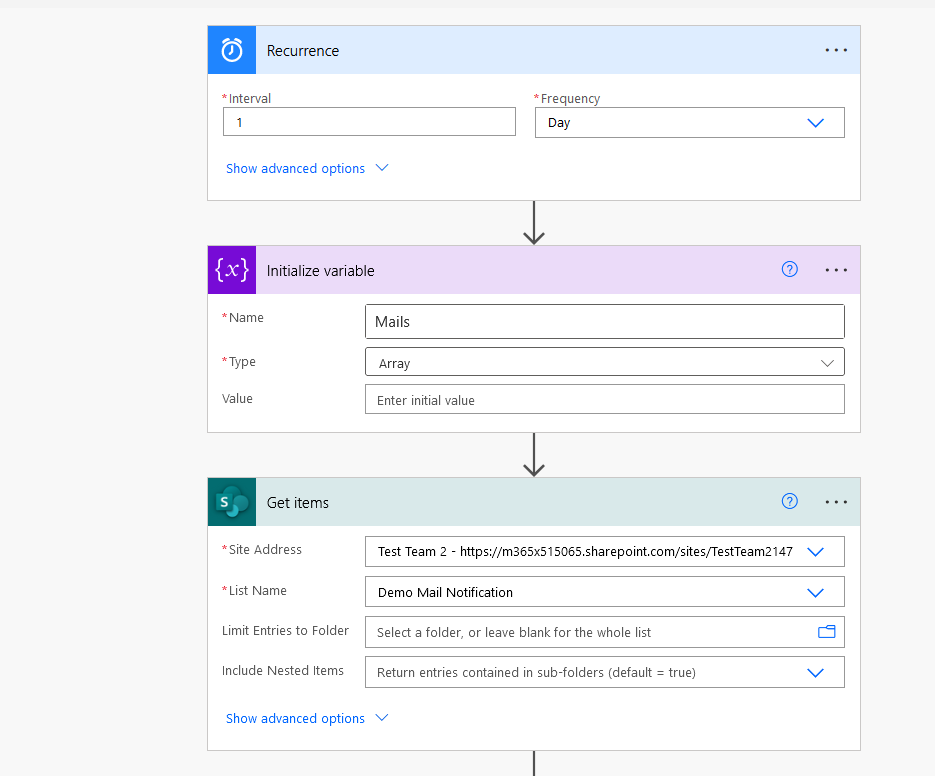
- Let's go to the first step. We create a Power Automate Flow with the desired trigger for example run 1 time per day and initialize an array variable. Furthermore we create the action "Get Items" on our SharePoint list.

- If we run the flow and have a look at the ouput, our "Responsible" field will look like the picture below. In the following steps we will access and format the "Email" information.
{
  "Responsible": [
    {
      "@odata.type": "#Microsoft.Azure.Connectors.SharePoint.SPListExpandedUser",
      "Claims": "i:0#.f|membership|meganb@m365x515065.onmicrosoft.com",
      "DisplayName": "Megan Bowen",
      "Email": "MeganB@M365x515065.OnMicrosoft.com",
      "Picture": "https://m365x515065.sharepoint.com/sites/TestTeam2147/_layouts/15/UserPhoto.aspx?Size=L&AccountName=MeganB@M365x515065.OnMicrosoft.com",
      "Department": "Marketing",
      "JobTitle": "Marketing Manager"
    },
    {
      "@odata.type": "#Microsoft.Azure.Connectors.SharePoint.SPListExpandedUser",
      "Claims": "i:0#.f|membership|alexw@m365x515065.onmicrosoft.com",
      "DisplayName": "Alex Wilber",
      "Email": "AlexW@M365x515065.OnMicrosoft.com",
      "Picture": "https://m365x515065.sharepoint.com/sites/TestTeam2147/_layouts/15/UserPhoto.aspx?Size=L&AccountName=AlexW@M365x515065.OnMicrosoft.com",
      "Department": "Marketing",
      "JobTitle": "Marketing Assistant"
    }
  ]
}
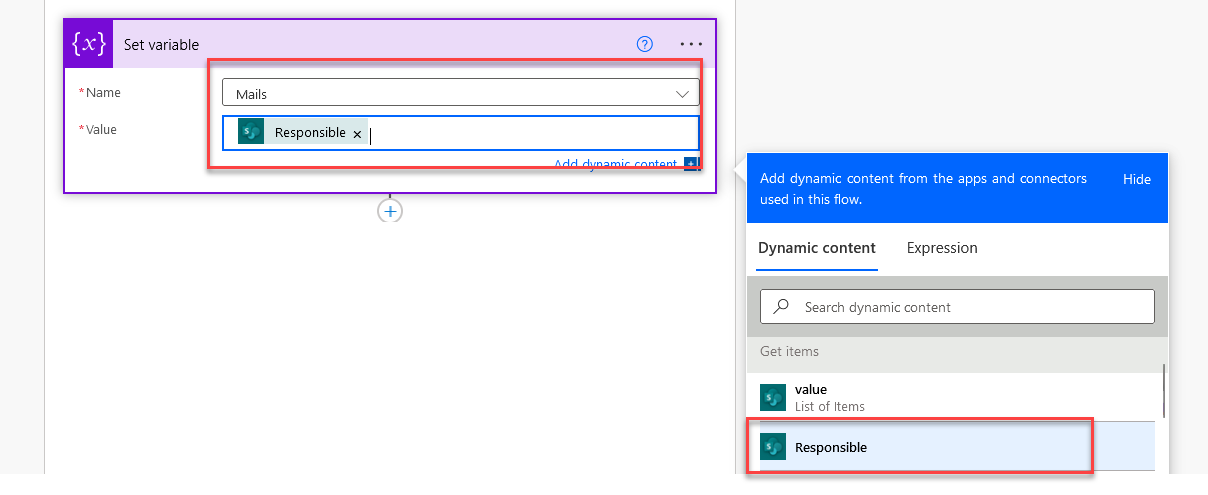
- In the next step we will set the predefined variable "Mails" to the Responsible field and have an array variable with our Resonsible users.

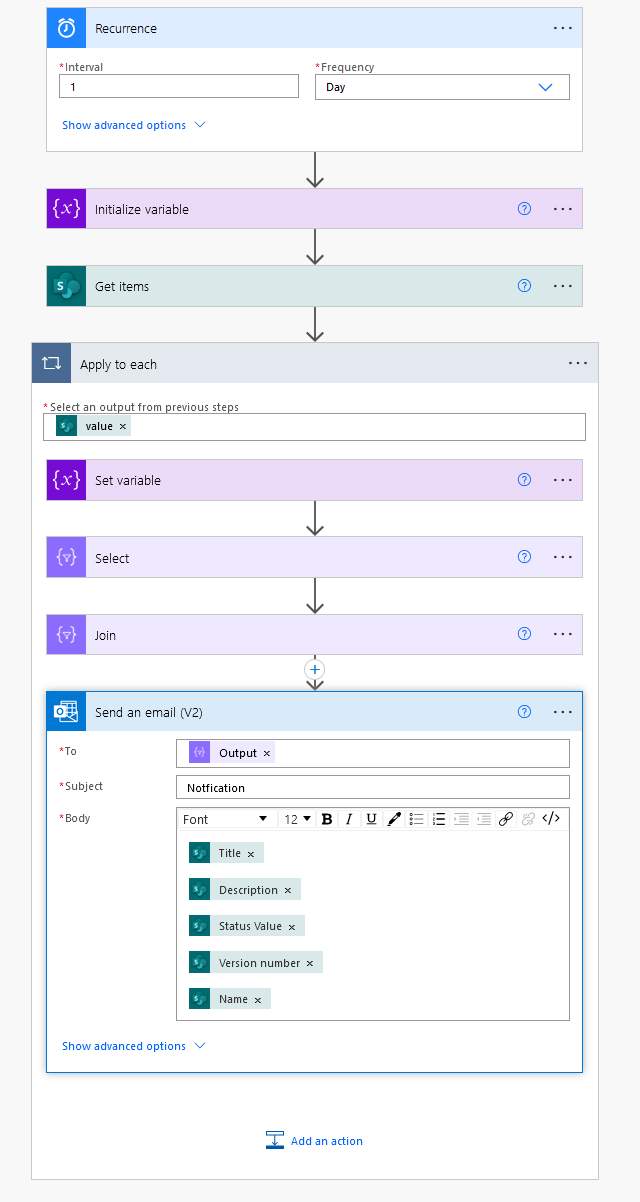
- In the next step a "Select Operator" is created. Within the Select Operator in field "From" the previously set array variable is used and within "Map" 'SwitchMode' is changed and the following expression
Item()['Email']is added to access the email addresses of the users.

- In the last step the email addresses have to be formatted correctly so Outlook can use them, therefore it is necessary to convert the values separated by ";". For this a join operator is used. 'From' is the output of the select action and 'Join with' is defined as the separator ";"

The formatting of the email addresses is complete and now can be used for the Outlook connector, for example to inform users about the status of SharePoint list items.

Process low level NtSecurityDescriptor
The SECURITY_DESCRIPTOR structure stores security related attributes of an object. It determines, who can access the object and which additional permissions are assigned. Because sometimes you are confronted with the "raw" NtSecurityDescriptor e.g. in Active Directory related scenarios, I tried give an overview about all parts of it.
Solve your container root certificate trust issues with Azure Container Registry tasks
When working with internal container deployments, there are many cases, where applications need to access an internal HTTPS service. If these services use internal certificates from an internal certificate authority (CA), the client (container/pod) needs to trust the certificate chain including the Sub/Issuing CA certificate and the Root CA certificate. These certificates have to be added to the trusted ROOT CA store, which should not be done at runtime (hence not with a sidecar container or similar constructs). The solution to this problem would be to add them at build time. We will discover how this process can be simplified and automated by using Azure Container Registry (ACR) tasks.
